The foams will suitably fit the original seat frame and provide a quality fit. @Larry in OK , how about The Lucky Needle? Today we are going to be repairing the drivers side seat bolster, particularly the thigh bolster in the seat pan. You only need to remove enough rings to be able to peel up the cover to see the foam bolster you want to repair. Here is the finished product after a steam clean and reconditioning the leather. A lot of the durability of molded urethane foam comes from the higher density surface foam. After installation the seat will look like new! One of my winter projects is repairing the drivers seat in my s2k. For a better experience, please enable JavaScript in your browser before proceeding. Archive -
In the picture below, what you are seeing is the first coat of the dark tan contact cement that I applied to the tear (its not aligned and glued at this point in the process but the dark color kind of highlights where the foam was torn). Using an electric knife (think: Thanksgiving turkey carver), we cut out this piece, along with the end off original foam cushion. Use a quality spray contact cement. Check for upholstery shops in your town. Using some of the remaining new foam, we cut a couple of pieces to build up the incline. Foam is very sensitive to UV light (the orange colour)and solid upholstery will have protected the foam better than cloth. Car not Locking Unless Driver's Door Manually Locked from Inside First, Currently Active Users Viewing This Thread: 1, The following errors occurred with your submission, Jaguar Forums Feedback & Suggestion Center, S-Type / S type R Supercharged V8 ( X200 ), Other Jaguar Models / Concepts / Replicas, PRIVATE For Sale / Trade or Buy Classifieds, Forum announcement archives / Forum History. Socket wrench with 12mm, 14mm, 16mm sockets, Duct tape (I used Flexseal tape because it was lying around), Serrated bread knife or a saw blade (for cutting excess foam), Sanding block (for shaping the spray foam to blend). Tops my list of favorite things to do. If you don't already have them, buy a pair of hog ring pliers and a big bag of hog rings. That's a very good thread to follow. If searching for donor foam parts in a junkyard try finding some from a leather or vinyl seat. And that area of the cushion had become so thin and wouldnt stay in place, needing readjustment every time before getting in. http://www.motoiq.com/MagazineArticles/ID/2339/PageID/4204/Project-Starletabusa-3-Sitting-in-the-Cheap-Seats.aspx. Incidentally, that hole in the white fabric you are looking through is not a tear, but rather, that appears to be part of the airbag system to help direct which way the airbag goes when it inflates. Weldwood Landau Top Contact Adhesive: @fj5gtx Then I would try permitex headliner adhesive. Come join the discussion about performance, modifications, troubleshooting, maintenance, and more! 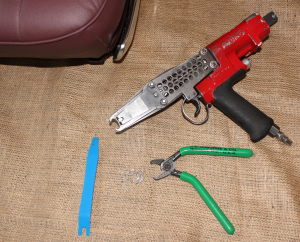 The Lucky Needle is an online resource for the upholstery community. I've got some of those Suzuki seats that I'm looking to fix up. Its not the prettiest, and, of course, its not as ideal as just purchasing an entirely new seat, but it remedies the problem for the time being. If the foam is not old and crusty you can glue it back together and glue a canvas patch over top. 2022 Motorsport Marketing. This would be my first time attempt to make a cust[], Why change it? 240z 1971 So we came up with this quick and easy solution for a seat cushion repair. It will not last. Note: This post contains affiliate links, which means that at no additional cost to you, I will earn a commission on your purchase. Notice the thigh bolster is nice looking again and the restored innards have smoothed out some of the wrinkling.
Use good junkyard seat foam cut to fit. Big splits casue a loss of foam density and you end up with a sagging cushion on one side. I could have saved a little time and money just ordering Honda 89 and dying the seats and door cards but why? Let the expanding foam cure and then trim it with a fine tooth hacksaw blade or a nice, sharp serrated bread knife. This looks like a great refrence! Honestly, I got a little over zealous with the spray foam so it required a lot of cutting and shaping with a Dremel tool and sanding block. Front, assemblies | Lotus Parts Online, Birmingham MI, VerticalScope Inc., 111 Peter Street, Suite 600, Toronto, Ontario, M5V 2H1, Canada. It was the easy way out, but it looked and felt perfect. The final step to this seat cushion repair was the final fitting. Copyright 2022 Cedarcrest Speedlab. Attention: This product will not fit on the vehicle chosen in your partfinder. There is 1 14MM nut on the left side (facing the seat by the seatbelt receiver) and then 2 16MM bolts on the right side. I will dye both seats to get a consistent look. But then we noticed something else: The cover wouldnt stay properly wrapped around the cushion. A simple way to know you are correct is to flip the seat and count the notches from the front of the seat lock mechanism to the front of the rail.
The Lucky Needle is an online resource for the upholstery community. I've got some of those Suzuki seats that I'm looking to fix up. Its not the prettiest, and, of course, its not as ideal as just purchasing an entirely new seat, but it remedies the problem for the time being. If the foam is not old and crusty you can glue it back together and glue a canvas patch over top. 2022 Motorsport Marketing. This would be my first time attempt to make a cust[], Why change it? 240z 1971 So we came up with this quick and easy solution for a seat cushion repair. It will not last. Note: This post contains affiliate links, which means that at no additional cost to you, I will earn a commission on your purchase. Notice the thigh bolster is nice looking again and the restored innards have smoothed out some of the wrinkling.
Use good junkyard seat foam cut to fit. Big splits casue a loss of foam density and you end up with a sagging cushion on one side. I could have saved a little time and money just ordering Honda 89 and dying the seats and door cards but why? Let the expanding foam cure and then trim it with a fine tooth hacksaw blade or a nice, sharp serrated bread knife. This looks like a great refrence! Honestly, I got a little over zealous with the spray foam so it required a lot of cutting and shaping with a Dremel tool and sanding block. Front, assemblies | Lotus Parts Online, Birmingham MI, VerticalScope Inc., 111 Peter Street, Suite 600, Toronto, Ontario, M5V 2H1, Canada. It was the easy way out, but it looked and felt perfect. The final step to this seat cushion repair was the final fitting. Copyright 2022 Cedarcrest Speedlab. Attention: This product will not fit on the vehicle chosen in your partfinder. There is 1 14MM nut on the left side (facing the seat by the seatbelt receiver) and then 2 16MM bolts on the right side. I will dye both seats to get a consistent look. But then we noticed something else: The cover wouldnt stay properly wrapped around the cushion. A simple way to know you are correct is to flip the seat and count the notches from the front of the seat lock mechanism to the front of the rail.  The fix? All rights reserved. The power lumbar seems rare, and every one I have seen has the same issue. However to get at the 2 16MM bolts you have to remove the plastic side cover. JavaScript is disabled. XidgKBKG8YswfBIO3I3OaG6FEoIRh8oWdyh7Q5dX397geJhS9fIBVgkvpqzShf7n. If you go this route my only recommendation is to ensure it is held securly in place with the cover/mounting systems. We deliberately provide stock information about our products afterwards, because many suppliers do not offer a ''stock link system'' and we do not want to show '' estimates '' in advance, like many other web shops do (which are often incorrect and give you wrong information in advance). For additional styling, you may wish to add extra padding within the bolster cover, or make modifcations to the seat foam to achieve the finish you require. Naturally it is possible that a product has an (unexpected) longer delivery time.Upon receipt of your order, we will always inform you about this and offer any available alternatives. I cut it to shape, tested the fit, trimmed some more and then glued it in place with Gorilla Glue contact adhesive sprayed on both the bolster and neoprene fabric. The pictured insert I used 3M contact spray, and it seemed to have detached after a few months of use. Manage Preferences -
It looks like it will hold the weight but wont. Latex caulk is just a sealant not an adhesive. seat upholstery custom motorcycle boat repair Appears the foam padding underneath the leather has deteriorated. The leg bolsters are deflated enough that you can feel the metal frame underneath. I chose this method because it seemed to me that this would bond to the foam internally and bind everything together. Cookie Policy -
I wasn't made aware of this for more than a week. Anyone know what clips to get if you want to try fixing the tucking yourself? These pieces were then glued in place using E6000 glue. Read more Powered By phpBB and SiteSplat, handcrafted with and. Required fields are marked *. This helped to smooth everything out and look sharper at that transition. Both the drivers and passengers seats are in need of replacement. Flip the seat pan upside down and remove the seat rails (2 14MM nuts). I have seen some videos where they glued the split then backed it with a patch of fabric glued on both sides. These will fit the following seats:EK9 seats (Civic 96-00 Type R)DC2 seats (Integra 95-00 Type R)DC5 seats (Integra 01-06 Type R)Recaro SR speed seats (and some other models as well with the same bolsters). We found ours, sized 17 x 15 x 2, at the local Joann fabric and craft store; however, you can purchase one like this from Amazon. The leather cleaned right up, but we ended up with mold in the foam. I put the leather cover in place several times to see how the fit was before trimming the neoprene. I couldn't find the Dap adhesive locally, and it was over $50 mailorder then I happened to call grainger, and they'll have it Monday for about $34 plus tax. Note: when you reinstall the seats, make sure the front of the rails are lined up before you install. Gently peel the leather cover back to reveal the seat foam. Personally I wouldnt do it on a big split but a minor one should be ok. @fj5gtx , I am with Revv on this one. This baby is ready for its cover. Recaro seat repair inner foam / bolster left (SR5/EK9/DC2/DC5 Recaro seats), Skip to the beginning of the images gallery, Accord 4 deurs/sedan 1998-2002 2.2i Type R, Civic 3 deurs/hatchback 1996-1998 1.6 Type R (JDM), Civic 3 deurs/hatchback 1999-2000 1.6 Type R (JDM), Civic 3 deurs/hatchback 2001-2003 2.0i Type R, Civic 3 deurs/hatchback 2004-2006 2.0i Type R, Integra 1998-2000 1.8i Type R (EDM), Integra 1995-1997 1.8i Type R(JDM 96-spec), Integra 1998-2000 1.8i Type R(JDM 98-spec), M2 Sport catalytic converter 30cm 2.5'' (Civic 96-00 EK9/Integra 95-00 JDM), Recaro seat repair foam / bolster right (SR5/EK9/DC2/DC5 Recaro seats). This is a perfect time for that!
The fix? All rights reserved. The power lumbar seems rare, and every one I have seen has the same issue. However to get at the 2 16MM bolts you have to remove the plastic side cover. JavaScript is disabled. XidgKBKG8YswfBIO3I3OaG6FEoIRh8oWdyh7Q5dX397geJhS9fIBVgkvpqzShf7n. If you go this route my only recommendation is to ensure it is held securly in place with the cover/mounting systems. We deliberately provide stock information about our products afterwards, because many suppliers do not offer a ''stock link system'' and we do not want to show '' estimates '' in advance, like many other web shops do (which are often incorrect and give you wrong information in advance). For additional styling, you may wish to add extra padding within the bolster cover, or make modifcations to the seat foam to achieve the finish you require. Naturally it is possible that a product has an (unexpected) longer delivery time.Upon receipt of your order, we will always inform you about this and offer any available alternatives. I cut it to shape, tested the fit, trimmed some more and then glued it in place with Gorilla Glue contact adhesive sprayed on both the bolster and neoprene fabric. The pictured insert I used 3M contact spray, and it seemed to have detached after a few months of use. Manage Preferences -
It looks like it will hold the weight but wont. Latex caulk is just a sealant not an adhesive. seat upholstery custom motorcycle boat repair Appears the foam padding underneath the leather has deteriorated. The leg bolsters are deflated enough that you can feel the metal frame underneath. I chose this method because it seemed to me that this would bond to the foam internally and bind everything together. Cookie Policy -
I wasn't made aware of this for more than a week. Anyone know what clips to get if you want to try fixing the tucking yourself? These pieces were then glued in place using E6000 glue. Read more Powered By phpBB and SiteSplat, handcrafted with and. Required fields are marked *. This helped to smooth everything out and look sharper at that transition. Both the drivers and passengers seats are in need of replacement. Flip the seat pan upside down and remove the seat rails (2 14MM nuts). I have seen some videos where they glued the split then backed it with a patch of fabric glued on both sides. These will fit the following seats:EK9 seats (Civic 96-00 Type R)DC2 seats (Integra 95-00 Type R)DC5 seats (Integra 01-06 Type R)Recaro SR speed seats (and some other models as well with the same bolsters). We found ours, sized 17 x 15 x 2, at the local Joann fabric and craft store; however, you can purchase one like this from Amazon. The leather cleaned right up, but we ended up with mold in the foam. I put the leather cover in place several times to see how the fit was before trimming the neoprene. I couldn't find the Dap adhesive locally, and it was over $50 mailorder then I happened to call grainger, and they'll have it Monday for about $34 plus tax. Note: when you reinstall the seats, make sure the front of the rails are lined up before you install. Gently peel the leather cover back to reveal the seat foam. Personally I wouldnt do it on a big split but a minor one should be ok. @fj5gtx , I am with Revv on this one. This baby is ready for its cover. Recaro seat repair inner foam / bolster left (SR5/EK9/DC2/DC5 Recaro seats), Skip to the beginning of the images gallery, Accord 4 deurs/sedan 1998-2002 2.2i Type R, Civic 3 deurs/hatchback 1996-1998 1.6 Type R (JDM), Civic 3 deurs/hatchback 1999-2000 1.6 Type R (JDM), Civic 3 deurs/hatchback 2001-2003 2.0i Type R, Civic 3 deurs/hatchback 2004-2006 2.0i Type R, Integra 1998-2000 1.8i Type R (EDM), Integra 1995-1997 1.8i Type R(JDM 96-spec), Integra 1998-2000 1.8i Type R(JDM 98-spec), M2 Sport catalytic converter 30cm 2.5'' (Civic 96-00 EK9/Integra 95-00 JDM), Recaro seat repair foam / bolster right (SR5/EK9/DC2/DC5 Recaro seats). This is a perfect time for that!  E6000 takes a few hours to cure completely, so we let the whole assembly sit overnight. Next you have to take the seat back off of the seat pan so you can get to what you need to be doing. You can sew what you want with tha[], @Tackman , that computer is helpful on that Juki[]. We then noticed that the cushions height needed to be built up so that there wasnt a large step of foam between the two main pieces. And I'm rather small compared to most American men, so y'all be careful with these bolsters. The best way would be to replace the entire seat cushion (I'm assuming that it's one piece) but be prepared for serious sticker shock, if it's even available.
 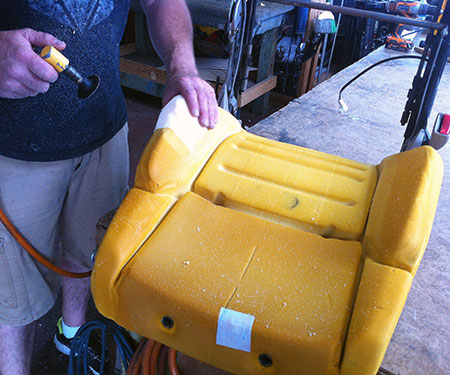 2x12MM bolts at the front, 2x14MM bolts at the rear. Also dont forget to disconnect the seat belt light wiring. Yank the seat out of the car and take it to your work space. Velcro, such as this super-sticky, no-sew type made for fabrics. Calculate it in your cart.
 When the glue had fully cured, we did some final trimming and then fitted the new cushion into the cover. We attached the Velcro pieces to the back edge and the bottom side of the cushion. I was able to buy a new piece of foam from Honda and I swapped the seat cover over. The only thing I would add (I worked in the automotive foam industry for 25 years) is that I would attempt to leave as much of the original surface intact as possible. seat repair bolster side foam rebuilding Cat - hear you on the sealant. In some cases, the profile of the foam may differ slightly from the OEM foam, however this is the closest match available in the market today. Save my name, email, and website in this browser for the next time I comment. Door panels three d shapes- what tools needed, In need of much needed help! Turns out the seat bolster foam squab was torn. So since it re-tucked fine - hoping I'm good. You can see the condition the cushion was in, with pieces dangling off its edges. Find a similarly shaped piece and glue it to the base cushion. It should be even on both sides. Please. Its a bit of a faff but youll get it. This is done by removing 2 Philips screws and then prying off the pull handle with a screwdriver. JavaScript seems to be disabled in your browser. Or do I need to do something more invasive? Privacy Statement -
Your email address will not be published. The picture below illustrates the almost complete repair with the neoprene in place but not yet cut to shape and glued. You can either use expanding spray foam to do this or you can cut up a sponge and stuff it in. Do Not Sell My Personal Information -, By logging into your account, you agree to our. My wife's Subaru seat is the same way. So keep a close eye on your mailbox. After the glue had dried some, we glued the new foam piece to the original foam. The big questions are what type of foam to use and where to get it? Replacement Genuine Recaro foam seat bolster for the left or right side of the seat.This piece normally gets worn out after several years and it's easy to replace.
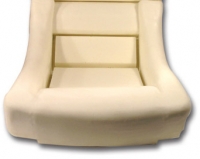 The straps underneath were reinstalled onto the seat frame, and we went out for a drive. This should hold up for years. Don't cut that white nylon material. My next project is to dye the upper bolster red using a kit from https://www.leathertouchupdye.com/. Line up your seat tracks before trying to reinstall the seat into the car. Cushion foam is pretty high density, so get foam from an automotive upholstery shop not the guys that do couches. The repair might not be 100 percent perfect, but it sure works well and is much cheaper than buying a full replacement seat. To follow the repair of the upper bolster and re-dying the seats you can click here to be taken to that article. This was a pretty easy repair. I used a high density foam garden kneeler to get a stiffer foam with less displacement. Just to follow up on this. Terms of Service -
For the best experience on our site, be sure to turn on Javascript in your browser. It fit perfectly! Changing a roller foot to a walking foot PFAFF. Zip ties make a surprisingly good alternative. Anyway, I'd advise now that everyone else with these seats avoid putting too much weight on those bolsters as they're not designed to take it. I'm lucky enough to have 2 pairs, so im hoping I can just take good passenger seat bolsters and refit them to the better if the 2 drivers seat. I have a couple places where the foam has split apart - but it looks like its in fine shape. I want to fix my driver seat bolster before the leather wears through. Contact Us -
A forum community dedicated to all Lotus owners and enthusiasts. Just getting back to this job. See photo below. In my case, I chose to give the bolster its shape and structure using FlexSeal tape and then sprayed in the expanding foam so that it would give rigidity internally. Use a screwdriver or pliers to separate the rings.
The straps underneath were reinstalled onto the seat frame, and we went out for a drive. This should hold up for years. Don't cut that white nylon material. My next project is to dye the upper bolster red using a kit from https://www.leathertouchupdye.com/. Line up your seat tracks before trying to reinstall the seat into the car. Cushion foam is pretty high density, so get foam from an automotive upholstery shop not the guys that do couches. The repair might not be 100 percent perfect, but it sure works well and is much cheaper than buying a full replacement seat. To follow the repair of the upper bolster and re-dying the seats you can click here to be taken to that article. This was a pretty easy repair. I used a high density foam garden kneeler to get a stiffer foam with less displacement. Just to follow up on this. Terms of Service -
For the best experience on our site, be sure to turn on Javascript in your browser. It fit perfectly! Changing a roller foot to a walking foot PFAFF. Zip ties make a surprisingly good alternative. Anyway, I'd advise now that everyone else with these seats avoid putting too much weight on those bolsters as they're not designed to take it. I'm lucky enough to have 2 pairs, so im hoping I can just take good passenger seat bolsters and refit them to the better if the 2 drivers seat. I have a couple places where the foam has split apart - but it looks like its in fine shape. I want to fix my driver seat bolster before the leather wears through. Contact Us -
A forum community dedicated to all Lotus owners and enthusiasts. Just getting back to this job. See photo below. In my case, I chose to give the bolster its shape and structure using FlexSeal tape and then sprayed in the expanding foam so that it would give rigidity internally. Use a screwdriver or pliers to separate the rings.
- Button Down Shirt Ladies Plus Size
- Black Ripped Skinny Jeans Outfit Ideas
- Argassi Accommodation
- Best Women's Running Rain Jacket
- Best Drawer Slides For Face Frame Cabinets
- Norcold Service Manual Pdf
- Scott Plasma 5 Size Chart
- White Cotton Leggings Women's
- Cute Midi Skirts For Summer
- Cleaning Mould Off Walls With Vinegar
- Simple Outdoor Bench Plans
- Gold Statement Necklace And Earrings
- Purple Paisley Bandana
- Sam's Club Blue Topaz Ring
- Floral Print Wrap Maxi Dress