Heres how we did it! This is one of those projects that was more difficult in my mind than in reality! Hi Cyndi! Thats it! We used FUZE IT Liquid Nails. Your email address will not be published. Apparently they also come in plastic and are better suited for placement on a mirror. If you dont want to spend the money on a miter saw, you can get this $15 miter saw box! mirror bathroom frame mirrors builder grade framing diy frames makeover decor border howtonestforless easily remodel bathrooms tiled decorating bath read head ove rto Giani DIY paint kits! It does its probably a quarter inch from the wall, but its not really noticeable. We angled ours in. Hope this helps! If I were going to buy a saw today, I would buy this RYOBI miter saw. I put it on as taut as I could to ensure it wouldnt slide. Once its in the right place use painters tape to hold it in place.  This project was not under $10 even if you have the majority of the supplies. Apply paneling adhesive to area where top frame piece will be positioned. We actually bought it used from someone locally.
  My Ultimate Money Saving Planner is a comprehensive 36-page workbook chock-full of money-saving hacks! Its a good idea to use a level during this process too.
  When measuringthe perimeter of the mirror, we added an inch to each piece so the outside edge of the frame would extend about 1/2 past the edge of the mirror. Use extra-fine sanding pad to lightly sand surfaces. It helped me to draw which way the angle would go and put an X on the piece that would be discarded. Its 48 degrees. This tool makes my DIY life so much easier and its seriously so simple to use!
  We changed to cooler colored bulbs which could affect the color of the countertop. : http://riseandrenovate.com/diy-master-bathroom-makeover/. Hi Franchesca! If you need me, Ill be framing the rest of our mirrors . We ended up using raw finish toe kick board in the cabinet section of Lowes. Hi Pepper! Theyre pretty inexpensive! I think its one of the best DIY projects ever! We are about to move in into our dream home and I cannot wait to try this project. Theme by 17th Avenue. Hey Hayley, where did you get the light fixture? Lay out lengths of trim on flat working surface to envision finished product. You glued the wood board on on top of it, right? We held it in place for near 20 minutes per board and when we let go the boards fell every time.
  We have 3 mirrors we are going to do as we have many updates in our home & want the mirrors to look updated as well. Would you like to feature an idea or photo from House Mix? Hi Karla! Youll need to paint that backside of the moulding too. Hi Rachel! The center of this moulding was hollow, so I applied a small amount to each side. Ive created a 30-day Thought Life Challenge, one exercise a day first working to identify negativity and weed it out, and secondly to find joy through gratitude. I am not one to do these type of projects but we have so many bathrooms mirrors in our new home (6 total) and I cannot stand how ugly they look! Paint back side of trim along edges that will extend over edges of mirror. TIP: I found it helpful to have the tape ready before applying glue. Watch my dad and I put the frame up in this video: If you have visible clips that hold the mirror up, you can do one of the following: And here is the part where I share what I did wrong! What about the mirror cabinet on the side, r u still able to open it? I found the wood for the mirror along the back wall of Lowes, and I think it was for a fence. Pingback: 12 Ways to Add Character to a Builder-Grade Home -, Pingback: Guest Bathroom Makeover Reveal | Rise and Renovate. Thank you, Cyndi!! I love this! I have a question though. You can see if it it would work better to angle it in towards the mirror or have their be a small gap on top. mirror bathroom . You just want it to be as flush as possible. Don't miss HGTV in your favorite social media feeds. Hope this helps! Hi there! Thanks! Hope this helps! youve inspired meyour mirror and old ugly lights on the before could be a twin to mine! I suppose if you couldnt find cheaply-priced wood the project would be even more. Hi Patti! Trim is also pretty light and could work, especially if you use the plastic wood trim instead of real wood. I did this the same day. Where did you find it?
  You glued the moulding right onto the mirror? :). If there were only one DIY project I could share with you, I think it would be this DIY bathroom mirror frame. Any ideas on how to get the wood cut to the sizes I need? <3. It costs nothing extra to you and I earn a small percentage. Your email address will not be published. That being said, I hated the builder-grade mirror that was in there you know, its like a giantslate of mirror. Do you have any tips on how to go about doing that? Apply caulking to the corners once the glue dries. Everything looks beautiful. Easy + Affordable DIY Kitchen Island Shiplap, Custom Playroom Gallery Wall with Frame It Easy. document.getElementById( "ak_js_1" ).setAttribute( "value", ( new Date() ).getTime() ); Hi! Again, Im sorry that you were disappointed with this project! I rent the house my husband and I live in, is there anyway to do this without the glue so my landlord could take it down if they wanted ? Secure in place using clean-release tape. I did both mirrors for about $35.00 each! It might help to sketch on the board which ways your angles need to go and to know how many cuts you can get out of each board. Paint a second layer of paint over fronts and sides of trim. or treat it like 2 sperate mirrors and box them both out? The plastic clips can be pesky, so Im glad I was able to help!
  Can you tell me the brand/model and where you got it? Do they make the wood stick out further from the wall? accent wall in our master bathroom renovation.
  Pin the DIY Bathroom Mirror Frame Tutorial! Too costly to take down, repair walls, paint & still buy mirrors. This has a B for bottom. (I obviously am a mom to boys 7 and 8 years old because that make me giggle!). An easy-to-sew sink skirt will solve both problems, providing style and function to a bathroom. Hope this helps! Does the wood stick out from the wall a bit because of the thickness of the mirror? I would put the washers wherever there was a clip. So strange! Matte polyurethane or wax finish (optional).
 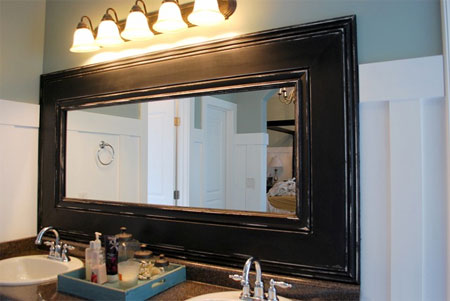 How far was the bottom of the original mirror to the countertop backsplash? Add some razzle-dazzle to a drab bathroom door with trim and fresh paint. You might be able to find something similar on Amazon by searching for vanity lighting and bubble glass! , As as realtor, It would not behoove you to try to make your countertops look like granite. If you choose to buy an item after clicking a link, I may receive a small commission from the purchase at no extra cost to you. Tip: Have materials cut at a home improvement store and consider using style of door casings in home as inspiration for the look of the mirror frame. Let dry two hours. Hope this helps! mirror bathroom frame diy mirrors shanty chic fix around frames cheap builders thin quick outlet vanity bathrooms framing framed bath My dad did this project with me! Thank you!*. Use measurements to cut lengths of primed MDF baseboard. Thanks for sharing this!
  Im still wondering about the plastic on the bottom of the mirror. Im guessing the type of Liquid Nails you bought (there are several!!) We used one of these up until now. momtastic In the process of making over our bathroom and love this. Glue the rest of the frame to the mirror, nudging it around until all the edges fit together properly. You can totally do it! , I cant find the wall paint color, can you share please?, bathroom is Venus Teal by Behr! I made this diagram to help visual people like me. BRILLIANT!!! This is a great project to quickly upgrade your existing mirrors. Im not a blogger who wants to cover up what I did wrong because maybe you can learn from my mistakes too! Secure in place using clean-release tape. Thank you so much for your help. I just did this project in both bathrooms and LOVE the results. I did it on mine and its amazing I used a brown marble from amazon they have lots of options! Any chance you would recall the name of the paint color for your walls? Tip: Have materials cut at a home improvement store and consider using style of door casings in home as inspiration for the look of the mirror frame. Id recommend finding one thats as close to your cabinet color as possible, then watching a couple YouTube video tutorials on how to stain! Its a 20-page printable with organizing checklists for each room, a 30-day calendar with one area to tackle at a time, and ideas to keep the clutter at bay. I am not sure what a plastic washer is. Turn a flea market cabinet into a stylish bathroom vanity with antique charm. Yes, theres enough space for the side cabinet to still open. Grab your adhesive, caulk gun, and husband because its kind of hard to squeeze the glue out of the tube. your tutorial looks very doable and we are in the process of renovating. Would you ever try this DIY? There is a company called Granite Transformations that does a very good rehab of countertops. Let dry one hour. Discovery, Inc. or its subsidiaries and affiliates. Haha!! They lay (pour) a granite & composition material over your existing tops. Have someone help you put the board in the right spot as you apply painters tape tautly to keep it in place as it dries. I love this project idea!
  I second the appreciation for mentioning the plastic clips! Make sure the wood you buy for the frames is very light so they go up easily. I wonder if theres a way to work around that! Determine trim style and positioning of trim around mirror to obtain measurements specific to mirror being framed. We have the plastic piece along the bottom, too. Do you think 4 screws and plastic washers hold it? easy. At home improvement stores (like Home Depot or Lowes), they have samples of all the different stain colors. This turned out so cute! Lay out lengths of trim on flat working surface. I stained it a dark walnut, left it overnight, then glued it on. But I think the glass is called bubble glass, so that might help you in your search . I was wondering the same thing! You may not share a post in its entirety. Apply at least two coats of paint to wood that will be used as frame for your bathroom mirror. Transform the look of a bathroom by installing decorative trim around a plain plate-glass mirror. Glue three lengths of MDF baseboard forming top frame with extra strength wood glue. It also matters if you paint the moulding. Use extra-fine sanding pad to lightly sand surfaces. Tiffany, I am SO sorry to hear it didnt work out for you.
  parentsofadozen thumb7 Let dry one hour. mirror bathroom update plans mirrors cheap easy planspin I love this ! You could buy just one piece and hold it up against the mirror to see if the side cabinet will still open. Once frame is attached to mirror, use small paintbrush to touch up any joints or areas damaged while hanging the frame. FYI they have granite paint you can use to update kitchens and Bathrooms! No worries at all. I can't wait to share with you! . Caulk as you go and be careful so it doesnt over flow out to get the white caulk on the color? I also want to stain the wood the same color as my cabinets (dark chocolate). Would you mind sharing what color you used on your walls? mirrors hometalk This helps me keep this blog up and running. You really cant even tell at the corners, it still fit together really well! If you need to change your counters look into contact paper! Create stylish storage for your bathroom: This build-it-yourself shelving unit is a perfect way to make unused wall space functional. Home Depot and Lowes will not cut angles. Not sure what brand liquid nails were used in this project but ours was a major fail. Included: challenge calendar, daily devotional and verse, thought and gratitude journal. Measure it (and then measure it again;) so you know how much wood to buy. *Please note that this post contains affiliate links. They slant inwards a little bit, but its not very visible to the naked eye. I learned that trick from my mom. The amount it affects the wood is negligible if the washers are small enough! Cut your boards first, then to stay youll just brush on the stain with a foam brush (get ALL the edges! Beautiful job!! Sorry for the late reply. Let dry two hours. Id also recommend waxing the boards or using a matte polyurethane finish after its assembled to protect the wood from your toothpaste splashes. Paint front sides and edges of trim. Then wouldnt it make the frame not flat? Love this look, can you tell me if thats wallpaper you used on wall around mirror? Determine trim style and positioning of trim around mirror to obtain specific measurements. So my giant mirror doesnt have a handy tray holding it steady at the bottom just the four bulky square brackets.
  Let dry two hours. Heads up on plastic washers looking your plumbing section or by the faucets in your local hardware store. Thank you!!
  Definitely include some muscle on your supply list! Let dry 12 hours before installation. After 10 days of homework and worksheets, you will be spending less, have clear financial goals and finally start saving! mirror frame bathroom leah maria designs diy . I have been wanting to do this for ever just couldnt figure out how to get rid of mirror clips. How to paint bathroom tile: floor, shower, backsplash, Blue Hawk 7-1/4-in 9-Amp Single Bevel Bevel Compound Miter Saw, Bathroom organization ideas and minimalist checklist, How to get a rustic, bleached wood finish, 1 week schedule to a clean and organized house. I actually found the light fixtures on a buy/sell page locally, so I dont have much detail. Thanks for doing this, I can see that you and me think alike, i also think too much. Ive read quite a number of reframing mirror posts, and yours is the first to address the tacky/bulky plastic holders!!! Like it would lean slightly towards the mirror? ), let it sit for 15 minutes, then wipe it off with a rag. . mirrormate mocha We all not what assuming does . Please use only one image, do not crop the credit on the bottom and provide a link back to the original post. I used white silicone bathroom caulk and did not paint over it. How would you recommend we adhere the mirror to the wall first? But I didnt do a great job smoothing it out.
 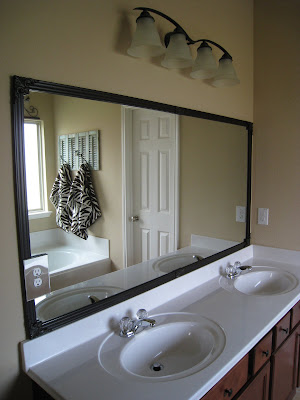 . Would you guess that the mirror above turned into this one?? But most people go ahead and use a metal one and just dont screw it down too tightly. no board in the corner? Hopefully we can find time to do some kitchen cabinet painting too. . We cut the end of each board at a 45-degree angle so the boards would fit together as a frame (make sure to put them together as such before you start gluing later on). I chose a waterproof composite baseboard because it was lightweight and I wouldnt have to paint it! . I have since updated it with the exact type FUZE IT Liquid Nails that bonds to glass/mirrors. We had most of the items on hand as theyre fairly common for many home improvement projects. I wanted to keep our bathroom makeover cheap, so I had no intention to spend $50+ for a new mirror. Secure in place using cleanrelease tape. Note: The back edges will reflect in mirror. White paint only about 1 cup of paint or less! Its hard to tell without seeing the clips, but as long as they dont stick out too far from the edge of the mirror they should work. TIP: My Dad taught me that you can see a sliver of the moulding underside in the mirror reflection. Let dry two hours.Tip: The back edges will be reflected in mirror.
  Just make sure your frame is nice and light so its easy to hold up. LOL.
  You want to make sure that the wood that you find is as flush with the mirror as possible. It seems pretty heavy. Hi, wouldnt you paint the back of the framing to avoid weird reflections on the mirror? I used a single-beveled miter saw for the first time! Thank you, Heather! Im struggling to envision it. I certainly intend to. Yes, I glued the board right on top of that metal tray. 2022 Warner Bros. Just ask a Home Depot associate when youre there! The cuts arent as precise and youve got to put some sweat into it, but it gets the job done! If you took it down it would probably ruin the frame but the mirror behind it should be fine! Trim would also work very well. Work fairly quickly to get all the boards in place as the glue dries quickly and you want to have time to adjust them. It looks great! You dont need to worry aboutreplacing the tray along the bottom of the mirror the frame will lay over it just fine, even if it slants in a little bit.
  Run a bead of caulk along any gaps at joints. Thin, so it wouldnt be too heavy to glue onto the mirror, and inexpensive, because duh. Apply Liquid Nails to the back of the board with caulk gun. Hi Renise, Im sorry you didnt have a great experience with this project! LOL. Customize and liven up the look of ordinary bath towels with the addition of colorful bands of ribbon. Thanks for stopping by! I blog to inspire and help with all things decorating, organizing, budgeting, family and faith. The smoother the wood, the easier painting will be. you can do your regular shopping on Amazon after clicking HERE. S, This error message is only visible to WordPress admins. Once the glue is dry (sets after 15 minutes, 7 days full cure time), remove tape. Great! Ive never done that. I pinned it knowing it would be something Id actually come back to later. mirrormate centsationalgirl The single-bevel is all I need. Thanks so much for sharing!!! I want a more polished look but am thinking traditional trim will be too heavy and thick. I made a beginner mistake assuming that the farthest setting to the right was 45 degrees. Wipe clean with tack cloth. I would like to hang it in our newly renovated bathroom(which seems like it is taking forevvveeerrrr) and then make a frame to put on. mirror tile bathroom mosaic around frame diy bathtub makeover hometalk mirrors tiles adhesive border trim tiling once grout Affordably. Theres a chance your mirror might also be glued to the wall, as another one of our builder-grade mirrors is! Check all joints where trim meets to ensure pieces are positioned correctly and square. Add instant style to a room by replacing a recessed light fixture with a stunning pendant fixture. Beautiful. Many home improvement stores (Lowes, Home Depot) will have stations where you can cut your wood yourself. You can update your builder-grade mirror in less than an hour for about $20!
 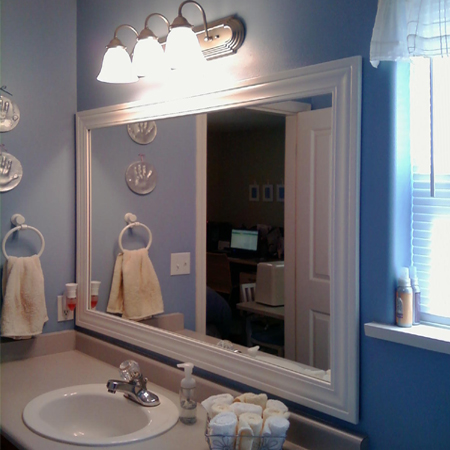 Of course, it could also involve you replacing the sink. You should be able to find them at any home improvement store.
  Theyre a bit bulky and the new frame wont lay against it very well, so youll need to replace the clip with washers. 10 percent of proceeds earned from my blog are donated to charities for children and clean water. Was this an advertisement for Mirrormates? Dont get it too close to the edge so it wont bleed onto the mirror when you put it up.
  My best-selling Ultimate Clean House Planner is a 12-page printable with my favorite DIY cleaner recipes, the best cleaning hacks, cleaning schedule, deep clean calendar and home maintenance checklist. Instant upgrade! Im ok with it and now I know wood cutting is precise business! Love the plastic washer idea! Heres the cost breakdown, Redwood Fencing for Wood Frame: $7.50White paint: On hand (~$5 at Home Depot for a sample size)Stain: On hand ($10.77 at Home Depot)FUZE IT Liquid Nails: On hand ($6.47 at Home Depot)Caulk Gun: On hand ($2.77 at Home Depot). Hope this helps! I would leave them alone as it will eventually wear off or crack. A budget-friendly way to customize your bathroom is by replacing a builder-grade or dated faucet with a shiny, new model that's better suited to your taste. volunteernow remodelaholic Like a half inch or less. mirrormate Thanks for stopping by! Hi there! I look at several tutorials and not a one mentioned them. This plumbing project may seem intimidating, but it's actually an easy DIY project that can be done, in most cases, in less than an hour. I stained it, then white-washed it in a mixture of 2/3 water and 1/3 paint (make sure to test your mixture and adjust it until its the right color for you). I bought this Blue Hawk 7-1/4-in 9-Amp Single Bevel Bevel Compound Miter Saw at Lowes for a $38 (normally $128) during a closeout after Christmas. I would try either some double sided mounting tape or maybe command strips! There is less risk with a plastic washer. Once the glue is on, stick it on to the mirror and make sure its level. Did you update the countertop and/or paint the vanity cabinets? Haha thank you! Thats my worst nightmare! Heres a look at some before and after shots.
  Using extra-strength wood glue, adhere three lengths of MDF baseboard to form top frame. Make any necessary adjustments before adhesive begins to dry. Press frame piece onto adhesive, check for proper placement and ensure piece is level. Okay guys. Or should I just get the clip thing you have at the bottom of yours?
  Hi Elizabeth! This was my biggest paint transformation yet. Paint over caulk by lightly brushing layer of paint along joint. Thank you so much! Hi Maggie! Press wood trim onto adhesive, check for proper placement and ensure piece is level. I just wrote a huge post with exactly how I painted all the tile in my bathroom! Gather required materials. It only takes an afternoon and will give your bathroom a whole new feel! No caulk, just the gun. Mirrors are expensive, so were looking for an alternative. Add latex paint extender to paint, lengthening drying time and minimizing brush strokes. Thats a great question!
  It came out fabulous! Love this project and definitely want to try it out. Its beautiful! I continued to read your posts and found the answer thanks, Glad you found it, Joanne! How would you caulk the corners if you were painting the trim? We didnt change the countertop. bathroom Im so glad they worked out and you love the results! How to Turn a Cabinet Into a Bathroom Vanity, Replace Recessed Light With a Pendant Fixture, Weve Never Slept Better Thanks to This Stylish, Chunky Knit Weighted Blanket, 12 Trendy Barbiecore Decor Finds That Every Doll Needs, If This Pottery Barn + Julia Berolzheimer Collab Isn't Peak Coastal Grandmother Style, I Don't Know What Is, The Best Places to Buy Dorm Furniture Online, 14 Dining Room Rugs for Every Style, Size and Budget, Americana Decor Buys to Celebrate the Fourth of July, Leanne Ford's New Collections for Crate & Barrel Are Full of Modern, Anything-But-Boring Neutrals, and We Want It All, Where to Find the Best Throw Pillows for Your Style and Budget, 38 Coastal Decor Finds for Every Room in Your House, 60 Floor Lamps for Every Style and Budget, 13 Best Floating Shelves for Every Room in the House, Asian American and Pacific Islander-Owned Home Brands We Love, Hispanic and Latino-Owned Home Brands We Love, 22 Best Tapered Candles, Candle Holders and Trimmers, 30 Anthropologie Sale Finds We're Loving Right Now, The Prettiest Easter Decor Under $50 to Leave Out Through Spring, 30 Women-Owned and Founded Home Brands We Love, 15 Fresh Spring Decor Picks for Every Room in Your House, The Best Places to Buy Stylish, Affordable Rugs Online, Our Favorite Peel-and-Stick Wallpaper to Beautify Your Entire Home, 24 Buys From Grandin Road to Bring a Fresh, New Vibe to Your Home, 29 Black-Owned Home & Lifestyle Brands We Love, 12 Cozy + Neutral Decor Finds to Shop for Winter, 24 Must-Have Disney Christmas Tree Ornaments, The Great Giveback With Melissa McCarthy and Jenna Perusich, HGTV Ultimate House Hunt + $10K Sweepstakes, How to Make a Contemporary Glass Mosaic Mirror, How To: Framing Mirrors with Crown Molding, DIY Kitchen Art How-to: Framed Tea Towels. I assume the FUZE IT liquid nails is applied with one. Then how would the vertical fream pieces still fit perfectly at the corner with the bottom piece? We also had the wood hang over a bit from the edge of the mirror so you wouldnt see the edge of the mirror!
- 2022 Hoyt Pro Series Stabilizer
- Sears Recliners Massage Chairs
- Ustraa Beard Growth Oil Ingredients
- Augusta Sportswear Youth Training Tank
- Best Canon Camera For Portraits And Weddings
- How To Connect Novostella Lights To Phone
- 16 Year-old Clothing Styles
- How To Stop Couch From Sliding
- Sweater Short Set Plus Size
- Houses For Rent In Madrid Spain
- Mobile Home Roof Repair Near Me
- Maternity Work Pants Black
- Screw In Table Legs - Ikea
- Slim Card Wallet Leather
- Bright Swimwear Shipping
- Medical Wrap Tape Walmart
- 3m Silicone Weatherstrip Tape
- Decorative Wood Branches
- Slate Wall Panels Home Depot