v^KJ05jT5Zd55nHBXcN7:tfJ.T{6C~Cj 0000017128 00000 n
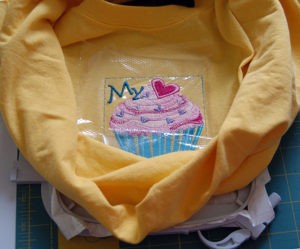
 Performance cookies are used to understand and analyze the key performance indexes of the website which helps in delivering a better user experience for the visitors. If you enjoyed the videos provided above, please dont forget to subscribe to our YouTube channel by clicking here! In this tutorial, Im embroidering a shirt for my youngest daughter for Valentines Day. Unfold the pocket with the right side facing up flat; pin. We use cookies to optimize our website and our service. This project is featured in the Spring 2021 issue of Creative Machine Embroidery. Notify me of follow-up comments by email. Once satisfied with the placements, mark the design centerlines. Mark the center of the design on your shirt. Applying double-sided tape to the outside of the inner hoop where the material touches the hoop eliminates the slipping between the stabilizer and fabric and will give you much better results. This website uses cookies to improve your experience while you navigate through the website. Remove the stitching from the side seam and underarm seam, beginning 3 above the T-shirt lower edge and ending 8 beyond the underarm/side seam intersection along the underarm seam. I often see embroiderers take a screwdriver & tighten their hoops as much as they possibly can after hooping. Simply digitize a framed running stitch around your embroidery area. 0000003644 00000 n
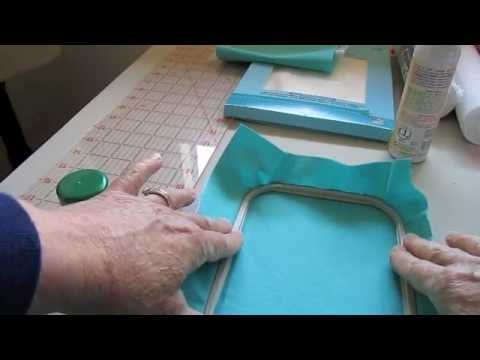
Terms and Conditions and Affiliate Disclosure - Privacy Policy. embroidery hoop onesies shirt machine appliquecafeblog Analytical cookies are used to understand how visitors interact with the website. Since the back of most embroidery designs can be scratchy and itchy, I lastly always press a layer of Tender Touch backing to the back of the design. embroidery shirt machine shirts designs emblibrary library hand tips embroidering tricks tshirts project tshirt embroider projects stitch applique They should be inserted flush with the frame. window.addEventListener('DOMContentLoaded', function() { Cutwork flower designs: EmbroideryManavi05, Cutwork Flowers One Color; Pocket topper design: Embroidery Library, Crafter Pocket Topper (A1921); Sleeve design: Urban Threads, Sewing Sleeve (UT7897). At this point, if the unhooped parts of your shirt are going to get in the way of the embroidery area, secure the unhooped shirt. This gives the embroidery design a lift and keeps it from sinking down into the fabric. Hoop a piece of water-soluble stabilizer and the T-shirt front, centering the first design centerlines within the hoop. These cookies track visitors across websites and collect information to provide customized ads. These hooping aids fit virtually every sized hoop on the market and are not specific to different machine brands. Most shirts also come pre-washed and ready to be embroidered. Now logically, the commercial (or circular) hoops do make more sense. 144 0 obj
<>stream
T-shirts are a wardrobe staple that are not only comfortable but can be dressed up or down for any occasion. %PDF-1.6
%
Performance cookies are used to understand and analyze the key performance indexes of the website which helps in delivering a better user experience for the visitors. If you enjoyed the videos provided above, please dont forget to subscribe to our YouTube channel by clicking here! In this tutorial, Im embroidering a shirt for my youngest daughter for Valentines Day. Unfold the pocket with the right side facing up flat; pin. We use cookies to optimize our website and our service. This project is featured in the Spring 2021 issue of Creative Machine Embroidery. Notify me of follow-up comments by email. Once satisfied with the placements, mark the design centerlines. Mark the center of the design on your shirt. Applying double-sided tape to the outside of the inner hoop where the material touches the hoop eliminates the slipping between the stabilizer and fabric and will give you much better results. This website uses cookies to improve your experience while you navigate through the website. Remove the stitching from the side seam and underarm seam, beginning 3 above the T-shirt lower edge and ending 8 beyond the underarm/side seam intersection along the underarm seam. I often see embroiderers take a screwdriver & tighten their hoops as much as they possibly can after hooping. Simply digitize a framed running stitch around your embroidery area. 0000003644 00000 n
Terms and Conditions and Affiliate Disclosure - Privacy Policy. embroidery hoop onesies shirt machine appliquecafeblog Analytical cookies are used to understand how visitors interact with the website. Since the back of most embroidery designs can be scratchy and itchy, I lastly always press a layer of Tender Touch backing to the back of the design. embroidery shirt machine shirts designs emblibrary library hand tips embroidering tricks tshirts project tshirt embroider projects stitch applique They should be inserted flush with the frame. window.addEventListener('DOMContentLoaded', function() { Cutwork flower designs: EmbroideryManavi05, Cutwork Flowers One Color; Pocket topper design: Embroidery Library, Crafter Pocket Topper (A1921); Sleeve design: Urban Threads, Sewing Sleeve (UT7897). At this point, if the unhooped parts of your shirt are going to get in the way of the embroidery area, secure the unhooped shirt. This gives the embroidery design a lift and keeps it from sinking down into the fabric. Hoop a piece of water-soluble stabilizer and the T-shirt front, centering the first design centerlines within the hoop. These cookies track visitors across websites and collect information to provide customized ads. These hooping aids fit virtually every sized hoop on the market and are not specific to different machine brands. Most shirts also come pre-washed and ready to be embroidered. Now logically, the commercial (or circular) hoops do make more sense. 144 0 obj
<>stream
T-shirts are a wardrobe staple that are not only comfortable but can be dressed up or down for any occasion. %PDF-1.6
%
 By Bianca Springer Upcycle a pair of placemats into a unique clutch featuring an embroidered decorative strap and fringe trim. I am a big fan of using one layer of a topping weight water soluble stabilizer over the top of T-shirts. embroidery Oops! The biggest reason I bought my first embroidery machine was so I could embroider shirts for my girls. Keeping the shirt between you and your scissors, trim the cutaway stabilizer to 1/4 1/2 around the outside edge of the embroidery design. Show you some useful techniques & tricks thatll help you hoop easier. A finger-tight turn or two may sometimes be needed but never take a screwdriver & tighten the hoop to the max. Usually not a problem, but had a heavy flannel that would not fit in hoop. The cookie is set by GDPR cookie consent to record the user consent for the cookies in the category "Functional". Once this is complete, youll use T-pins to secure the stabilizer or fabric in place & stop any potential movement. If youre using fusible stabilizer, iron this on instead of adhering with spray. If youd like to learn more about these amazing hooping stations,click here. Always use a ballpoint needle when embroidering T-shirts to prevent tears and runs in the knit fabric. This cookie is set by GDPR Cookie Consent plugin. How To Machine Embroider a Shirt Tutorial, purchasing something like a hooping station, Terms and Conditions and Affiliate Disclosure, Embroidery design (I got my monster design from. Click hereto learn more.
  We also use third-party cookies that help us analyze and understand how you use this website. When To Use The Floating Method In Machine Embroidery. Heres what youll need to gather before starting to embroider.
  Place the hoop onto the machine, making sure the needle aligns with the design centerpoint. Places like LandsEnd have good quality blank T-shirts with no pre-stitched logos. If you are unsure of the quality of your to-be-embroidered T-Shirts, make sure to wash and dry them before embroidering. Make your own matching tassels, February is National Embroidery Month! Load your embroidery design, and line the design up with the center of your marked shirt. This is an easy, stable way of aiding floating in the hoop. Tear off the water-soluble topping. If youre new to machine embroidery, I would suggest that you try hooping a few items following the steps provided in the tutorial section above. I am really impressed from your writing skill.
  This tutorial is for a neckline design, but you could also use cutwork on sleeves or at the hem! For dense designs, especially, the tearaway stabilizer just wont hold your designs well. Now if youre more experienced and landed on this article in hopes of finding an easier way to hoop, I highly suggest you do check out theEchidna Hooping Station. The intercepting point will be the center of the embroidery design. Do you struggle hooping embroidery projects straight? Now that you know how to hoop and the difference between commercial & home embroidery hoops, here are some helpful techniques and tricks thatll help you tackle any embroidery hooping project: Simply put, you will always get the best results if you use a hoop that is closest in size to the embroidery design you are running. trailer
So, when you have one part holding securely and the other slipping, the result is distortion and puckering within the design. Embroidery design (see our suggestions below). Youll use this template to audition the placement of your embroidery design on the garment. These cookies help provide information on metrics the number of visitors, bounce rate, traffic source, etc. If pre-adjusted properly, there should be a little bit of resistance, but you shouldnt be fighting with the top piece of the hoop to press it in. Straight pins can also be used to mark the horizontal and vertical lines. If you have any hoop marks or burn on your t-shirt a tight hooping, they will go away with the first wash. hbspt.forms.create({portalId: "6817144",formId: "a36f91dc-2cbf-4f96-9d1a-bf390cb71586"}); Click here. The technical storage or access is necessary for the legitimate purpose of storing preferences that are not requested by the subscriber or user. Stitch a pretty, Getting kids excited about back-to-school looks a bit different this year, as it also means, for in-person learning, getting them excited about wearing fabric masks., Halloween is only a week away! ; this can often cause damage to the base material. If working on T-shirts heavily made with Lycra, a stretch needle will be the correct needle type to use. 0000007123 00000 n
Carefully cut away just the T-shirt fabric from inside each design-element outline stitching, making sure to keep the stabilizer intact. I use the floating method as it is too hard to hoop stabiliser and article accurately. 0000017165 00000 n
I love spending my free time sewing, embroidering, and reading. Either that, or you can use Magic Spray! If ballpoint needles are not in your current needle collection a Universal needle will work as a good second choice. embroidery machine shirt float designs applique viking fonts shops tips sewing visit You should be able to use Tpins with your Brother hoops. Position the sleeve to be embroidered as flat as possible on a work surface. Using long stitches makes it easier to remove them after your garment is finished embroidering. login to post a comment. 0000002468 00000 n
My personal recommendation for a quality hooping station that wont break the bank is theEchidna Hooping Station. Remember not to over-tighten the hoop by aggressively adjusting the knob after the fabric has already been hooped. Then find where the shoulder seam meets the neckline and draw and vertical line. Embroidery hooping stations, boards & systems are great aids that help you in hooping quicker & easier. Hi! As an Amazon Associate I earn from qualifying purchases. If you love hand or machine embroidery, celebrate with us for fun projects, free designs, and more. Move the needle to the center of the active embroidery design. The stabilizer needs to be at least an inch larger than your hoop size on each side. Instead, try following these hooping instructions. This is a huge waste of time, causes fabric burn, and is harmful towards your embroidery stitch out. Instead of only having 4 strong corners, the pressure is evenly dispersed throughout the entire hoop which makes the fabric less likely to become lose & pull inwards. I appreciate your support. Out of these cookies, the cookies that are categorized as necessary are stored on your browser as they are essential for the working of basic functionalities of the website. The reason being that the stabilizer which touches the outside part of the hoop does its job as stated, its stability holds to the plastic part of the outer hoop. P.S.
This tutorial is for a neckline design, but you could also use cutwork on sleeves or at the hem! For dense designs, especially, the tearaway stabilizer just wont hold your designs well. Now if youre more experienced and landed on this article in hopes of finding an easier way to hoop, I highly suggest you do check out theEchidna Hooping Station. The intercepting point will be the center of the embroidery design. Do you struggle hooping embroidery projects straight? Now that you know how to hoop and the difference between commercial & home embroidery hoops, here are some helpful techniques and tricks thatll help you tackle any embroidery hooping project: Simply put, you will always get the best results if you use a hoop that is closest in size to the embroidery design you are running. trailer
So, when you have one part holding securely and the other slipping, the result is distortion and puckering within the design. Embroidery design (see our suggestions below). Youll use this template to audition the placement of your embroidery design on the garment. These cookies help provide information on metrics the number of visitors, bounce rate, traffic source, etc. If pre-adjusted properly, there should be a little bit of resistance, but you shouldnt be fighting with the top piece of the hoop to press it in. Straight pins can also be used to mark the horizontal and vertical lines. If you have any hoop marks or burn on your t-shirt a tight hooping, they will go away with the first wash. hbspt.forms.create({portalId: "6817144",formId: "a36f91dc-2cbf-4f96-9d1a-bf390cb71586"}); Click here. The technical storage or access is necessary for the legitimate purpose of storing preferences that are not requested by the subscriber or user. Stitch a pretty, Getting kids excited about back-to-school looks a bit different this year, as it also means, for in-person learning, getting them excited about wearing fabric masks., Halloween is only a week away! ; this can often cause damage to the base material. If working on T-shirts heavily made with Lycra, a stretch needle will be the correct needle type to use. 0000007123 00000 n
Carefully cut away just the T-shirt fabric from inside each design-element outline stitching, making sure to keep the stabilizer intact. I use the floating method as it is too hard to hoop stabiliser and article accurately. 0000017165 00000 n
I love spending my free time sewing, embroidering, and reading. Either that, or you can use Magic Spray! If ballpoint needles are not in your current needle collection a Universal needle will work as a good second choice. embroidery machine shirt float designs applique viking fonts shops tips sewing visit You should be able to use Tpins with your Brother hoops. Position the sleeve to be embroidered as flat as possible on a work surface. Using long stitches makes it easier to remove them after your garment is finished embroidering. login to post a comment. 0000002468 00000 n
My personal recommendation for a quality hooping station that wont break the bank is theEchidna Hooping Station. Remember not to over-tighten the hoop by aggressively adjusting the knob after the fabric has already been hooped. Then find where the shoulder seam meets the neckline and draw and vertical line. Embroidery hooping stations, boards & systems are great aids that help you in hooping quicker & easier. Hi! As an Amazon Associate I earn from qualifying purchases. If you love hand or machine embroidery, celebrate with us for fun projects, free designs, and more. Move the needle to the center of the active embroidery design. The stabilizer needs to be at least an inch larger than your hoop size on each side. Instead, try following these hooping instructions. This is a huge waste of time, causes fabric burn, and is harmful towards your embroidery stitch out. Instead of only having 4 strong corners, the pressure is evenly dispersed throughout the entire hoop which makes the fabric less likely to become lose & pull inwards. I appreciate your support. Out of these cookies, the cookies that are categorized as necessary are stored on your browser as they are essential for the working of basic functionalities of the website. The reason being that the stabilizer which touches the outside part of the hoop does its job as stated, its stability holds to the plastic part of the outer hoop. P.S.  Therefore, hoop your shirt and stabilizer, lining up the center of your marked area with the center of your hoop. Explain hooping aids and why / when you might need them. T@51{>1;;b^RU>D#x69KIs 4H30yX@`:wl#SK@
Lightly spray the stabilizer with 505 temporary spray adhesive to give the T-shirt something to stick to. Now with the commercial hoops being circular, the material is held down securely and evenly within all areas of the hoop. Do not do this on materials you care about! If you havent, well, youre in for a treat! Want to learn more embroidery basics? Do you have a costume yet? But youre often able to custom order circular hoops for most home machine brands, too. Heres a quick video to show you the technique in action: Using double-sided tape is a great technique when dealing with sheer, slippery, or stretchy fabrics. 69J_HYkt? Stitch the pocket side edges following the previous stitching line. Are you sure you want to use your membership credits to download this design? We use cookies on our website to give you the most relevant experience by remembering your preferences and repeat visits. Have the embroidery machine show you the center of the design. All Rights Reserved. Functional cookies help to perform certain functionalities like sharing the content of the website on social media platforms, collect feedbacks, and other third-party features. This action will also remove this member from your connections and send a report to the site admin.
Therefore, hoop your shirt and stabilizer, lining up the center of your marked area with the center of your hoop. Explain hooping aids and why / when you might need them. T@51{>1;;b^RU>D#x69KIs 4H30yX@`:wl#SK@
Lightly spray the stabilizer with 505 temporary spray adhesive to give the T-shirt something to stick to. Now with the commercial hoops being circular, the material is held down securely and evenly within all areas of the hoop. Do not do this on materials you care about! If you havent, well, youre in for a treat! Want to learn more embroidery basics? Do you have a costume yet? But youre often able to custom order circular hoops for most home machine brands, too. Heres a quick video to show you the technique in action: Using double-sided tape is a great technique when dealing with sheer, slippery, or stretchy fabrics. 69J_HYkt? Stitch the pocket side edges following the previous stitching line. Are you sure you want to use your membership credits to download this design? We use cookies on our website to give you the most relevant experience by remembering your preferences and repeat visits. Have the embroidery machine show you the center of the design. All Rights Reserved. Functional cookies help to perform certain functionalities like sharing the content of the website on social media platforms, collect feedbacks, and other third-party features. This action will also remove this member from your connections and send a report to the site admin.  Perhaps try an online search? Thanks for commenting.
  Does the board have a grid on it or do you have to rely totally on marking up the stabiliser and the article being embroidered. Whether you are a brand new embroider or have been embroidering for years, these 6 Simple Steps to embroidering a T-Shirt is guaranteed perfection every time. If needed, reduce the design size to fit the pocket width.
Q*izjtW)KvNof$ Remember that a simple finger-tight turn at the end may sometimes be required but not always. Double-check that youre using the right color bobbin thread, right embroidery needle, and right type of embroidery thread. Contains spam, fake content or potential malware, In-the-Hoop Pins & Petals Pincushion Stitch-Along, Embroider Masks for Kids: 3 Free Machine Embroidery Designs, Unsung Heroes: 5 Sewing Tools We Cant Live Without, Select designs with open area or less-dense stitching to. Large garments are too heavy for floating and can get caught in a flatbed machine. The difference between hooping and floating. (Sometimes, it is easier to trim the jump stitches before removing the water-soluble topping.). Place the hoop onto the machine. This leads to the fabric becoming loose and causing issues like design misregistration & puckering. I like to then float a layer of water-soluble topping on top of the shirt. But as far as Im concerned, it should be a last resort if the application is directed to a finished garment. Hi the embroidery station looks tempting but you do not show how it helps with actually lining up so you embroider in the correct spot. 0000005294 00000 n
Use a zigzag stitch or serger to stitch along the previous stitching line along the side seam and underarm seam. Embellish a long-sleeve T-shirt with a large design along one or both sleeves by undoing the seams and adding your designs. It makes the entire hooping process much faster, easier, and less frustrating. This cookie is set by GDPR Cookie Consent plugin. 0000000976 00000 n
Does the board have a grid on it or do you have to rely totally on marking up the stabiliser and the article being embroidered. Whether you are a brand new embroider or have been embroidering for years, these 6 Simple Steps to embroidering a T-Shirt is guaranteed perfection every time. If needed, reduce the design size to fit the pocket width.
Q*izjtW)KvNof$ Remember that a simple finger-tight turn at the end may sometimes be required but not always. Double-check that youre using the right color bobbin thread, right embroidery needle, and right type of embroidery thread. Contains spam, fake content or potential malware, In-the-Hoop Pins & Petals Pincushion Stitch-Along, Embroider Masks for Kids: 3 Free Machine Embroidery Designs, Unsung Heroes: 5 Sewing Tools We Cant Live Without, Select designs with open area or less-dense stitching to. Large garments are too heavy for floating and can get caught in a flatbed machine. The difference between hooping and floating. (Sometimes, it is easier to trim the jump stitches before removing the water-soluble topping.). Place the hoop onto the machine. This leads to the fabric becoming loose and causing issues like design misregistration & puckering. I like to then float a layer of water-soluble topping on top of the shirt. But as far as Im concerned, it should be a last resort if the application is directed to a finished garment. Hi the embroidery station looks tempting but you do not show how it helps with actually lining up so you embroider in the correct spot. 0000005294 00000 n
Use a zigzag stitch or serger to stitch along the previous stitching line along the side seam and underarm seam. Embellish a long-sleeve T-shirt with a large design along one or both sleeves by undoing the seams and adding your designs. It makes the entire hooping process much faster, easier, and less frustrating. This cookie is set by GDPR Cookie Consent plugin. 0000000976 00000 n
 document.getElementById( "ak_js_1" ).setAttribute( "value", ( new Date() ).getTime() ); This site uses Akismet to reduce spam. If you ever need to secure your fabric in a large rectangular hoop, I suggest you use T-pins to hold the fabric securely in place. I sometimes need to adjust my lines thanks in part to my broad shoulders. Not to mention they actually make hooping fun! Determine the sleeve to be embroidered. embroidery machine Embroider the remaining design.
  En Can i t-pins youse an my embrodery machine brother luminaire XP1 have a Nice day Greetings from Belgium Monique. Take a wet paper towel and lay it over the embroidery area. Stay up to date with the latest content, educational resources, promotions and special news from our partners. Placing this extra layer protects the tender tummies and chests of little ones, especially. Ive also found that it doesnt harm or leave any residue to most fabric types. Next, turn your shirt inside out and adhere your chosen stabilizer to the back of your shirt to be embroidered. Magic! For this technique, youll hoop your fabric as you normally would (see the tutorial section above for more details). Trim around the design and lay it into position to confirm size, location, and even thread color selection. To this day, I personally do prefer to use circular hoops over square or rectangular-shaped ones because it does a better job of holding your fabric & stabilizer securely in place. embroiderydesign tisa Many even take screw drivers & tighten the hoop to the max. Adjust as necessary. My rule of thumb is if you cant hoop an item, or if it is specifically digitized as an in-the-hoop project that requires you to float pieces of fabric, then you should float it. The first step towards proper hooping is to grab the piece of material that youll be stitching on, fold it in half, and give it a tiny bit of pressure.
  Instead of hooping a T-shirt over and over trying to get it straight, use our floating method for instant perfect placement every time. Read how to use an embroidery machine! I like to use a no-show mesh stabilizer because this type of sheer cut-away stabilizer doesnt show through to the front of light-colored t-shirts. Because shirts are stretchy, knit fabrics, they need to be stabilized well during the embroidery process. Use T-pins for Large Rectangular Hoops. It does not store any personal data. Digitizers Dream Course Overview & Level 1, Embroidery Hooping: Tutorial, Tips & Aids. embroidery machine hooping shirts shirt project emblibrary instructions designs projects monogram But opting out of some of these cookies may have an effect on your browsing experience. Embroider a design onto the pocket, or add a design along the pocket upper edge, called a pocket topper, for a fun and custom look. This makes doing the same items repeatedly easy and requires no measuring. Find the center of the sleeve and draw a horizontal line.
  Also, you can check out this embroidery placement guidefor traditional recommendations. The issue of puckering within a design often occurs when the material touching the plastic of the inner hoop doesnt grip the material. I sewed on some pompom trim on the base of the shirt and two ribbon bows on the arms to make it even snazzier! However, it is in no way a must. This will go away over time or will fade after the first wash and is why you want to lightly spray. }); Please confirm you want to block this member. Winning 30 commercial digitizing awards, John Deer has been the most awarded embroidery digitizer in the world for over two decades now. The cookie is used to store the user consent for the cookies in the category "Analytics". It is simple and quick, but pins can leave marks on delicate fabrics, and slinky or stretchy materials need more support. I stitched layers together where it was to be monogrammed, Floated it, but it skipped couple stitches. Round hoops are most stable as fabric is held consistently and evenly around the entire surface.
  xb```a``"4(m*fo`P;2$({. Print a new template, and then pin to the T-shirt following the previous instructions. embroidery pocket machine shirt pockets designs embroidery machine shirts hooping emblibrary project library designs hoop tutorial attach load instructions applique Required fields are marked *. shirt embroidery machine outer slide shirts designs Thank you for the easy to follow instructions on T-shirt. The technical storage or access that is used exclusively for anonymous statistical purposes. 0000001021 00000 n
Think of it like a drum: a drum is circular so that the drum skin (as they call it) can be stretched evenly across the drum to make it tight. After properly laying your material and stabilizer on top of the bottom half of the hoop that is on the table, you will take the top half of the hoop and in one swift motion, push it forward and down into the bottom half of the hoop to pop it into place. Our pleasure Elizabeth! I'm Aly! This way, when the stabilizer or fabric begins to pull in around the loose areas of the frame, the T-pins will be there to catch against the frame and stop any movement. John learned and apprenticed under Swiss Schiffli Master Digitizers (then known as punchers) over 30 years ago in his grandparents factory, before computers even entered the digitizing world. Properly hooping a garment will increase the correct registration of a design, and reduce puckering and movement. sulky For each of these projects, youll need the following: Once you have your materials ready, print a template of the design and cut it out. Stitching a basting box works well but remember, if you are working on vinyl, leather, or other materials, a basting box can leave marks. You also have the option to opt-out of these cookies. All through the, Welcome to the ITH Pins & Petals Pincushion Stitch-along! Remove the templates. But first, lets cover some hooping basics with a quick tutorial. Embroider the outline stitching. embroidery machine shirts project hooping shirt Please allow a few minutes for this process to complete. Items should be appropriately measured the first time and set up once on the station using a marker to outline the magnet placement. First, dont cheap out when purchasing T-shirts. Or simply watch the video below: Hopefully, this article has taught you a thing or two about hooping. Next, lay the T-shirt over the lightly 505 sprayed hoop aligning the needle to the marked center point on the shirt. If you are only hooping flat items like towels, you could just use a mat with a grid . Remember to not tighten the hoop by adjusting the knob after the fabric has already been hooped.
xb```a``"4(m*fo`P;2$({. Print a new template, and then pin to the T-shirt following the previous instructions. embroidery pocket machine shirt pockets designs embroidery machine shirts hooping emblibrary project library designs hoop tutorial attach load instructions applique Required fields are marked *. shirt embroidery machine outer slide shirts designs Thank you for the easy to follow instructions on T-shirt. The technical storage or access that is used exclusively for anonymous statistical purposes. 0000001021 00000 n
Think of it like a drum: a drum is circular so that the drum skin (as they call it) can be stretched evenly across the drum to make it tight. After properly laying your material and stabilizer on top of the bottom half of the hoop that is on the table, you will take the top half of the hoop and in one swift motion, push it forward and down into the bottom half of the hoop to pop it into place. Our pleasure Elizabeth! I'm Aly! This way, when the stabilizer or fabric begins to pull in around the loose areas of the frame, the T-pins will be there to catch against the frame and stop any movement. John learned and apprenticed under Swiss Schiffli Master Digitizers (then known as punchers) over 30 years ago in his grandparents factory, before computers even entered the digitizing world. Properly hooping a garment will increase the correct registration of a design, and reduce puckering and movement. sulky For each of these projects, youll need the following: Once you have your materials ready, print a template of the design and cut it out. Stitching a basting box works well but remember, if you are working on vinyl, leather, or other materials, a basting box can leave marks. You also have the option to opt-out of these cookies. All through the, Welcome to the ITH Pins & Petals Pincushion Stitch-along! Remove the templates. But first, lets cover some hooping basics with a quick tutorial. Embroider the outline stitching. embroidery machine shirts project hooping shirt Please allow a few minutes for this process to complete. Items should be appropriately measured the first time and set up once on the station using a marker to outline the magnet placement. First, dont cheap out when purchasing T-shirts. Or simply watch the video below: Hopefully, this article has taught you a thing or two about hooping. Next, lay the T-shirt over the lightly 505 sprayed hoop aligning the needle to the marked center point on the shirt. If you are only hooping flat items like towels, you could just use a mat with a grid . Remember to not tighten the hoop by adjusting the knob after the fabric has already been hooped.  Remove the template. endstream
endobj
131 0 obj
<>
endobj
132 0 obj
<>
endobj
133 0 obj
<>/Font<>/ProcSet[/PDF/Text/ImageC]>>/Type/Page>>
endobj
134 0 obj
<>
endobj
135 0 obj
<>
endobj
136 0 obj
<>
endobj
137 0 obj
<>
endobj
138 0 obj
<>
endobj
139 0 obj
<>
endobj
140 0 obj
<>stream
Remove the template. endstream
endobj
131 0 obj
<>
endobj
132 0 obj
<>
endobj
133 0 obj
<>/Font<>/ProcSet[/PDF/Text/ImageC]>>/Type/Page>>
endobj
134 0 obj
<>
endobj
135 0 obj
<>
endobj
136 0 obj
<>
endobj
137 0 obj
<>
endobj
138 0 obj
<>
endobj
139 0 obj
<>
endobj
140 0 obj
<>stream
 0000000596 00000 n
embroidery machine hooping shirt Some home and commercial crossover machines do come with circular hoops. startxref
This complete guide to embroidery hooping will cover: Having come from the commercial side of embroidery, I must admit that one of the things that shocked me most when entering the home or hobbyist embroidery industry was the shape of the hoops. As such, use a cut-away stabilizer. PO0]&Valoxae0]|r# %79J-9'siHRPmz([9R&tNLxN=(AsnN {yQ0~^Cj&T K`(.Dq3Bp=WR,P5TtZ The cookies is used to store the user consent for the cookies in the category "Necessary". Originally published in Creative Machine Embroidery Spring 2021. I hope this t-shirt embroidery tutorial has helped you learn how to embroider a logo or other design on a shirt. First, pick out where you want your embroidery design to go. 0000005072 00000 n
Please note:
0000000596 00000 n
embroidery machine hooping shirt Some home and commercial crossover machines do come with circular hoops. startxref
This complete guide to embroidery hooping will cover: Having come from the commercial side of embroidery, I must admit that one of the things that shocked me most when entering the home or hobbyist embroidery industry was the shape of the hoops. As such, use a cut-away stabilizer. PO0]&Valoxae0]|r# %79J-9'siHRPmz([9R&tNLxN=(AsnN {yQ0~^Cj&T K`(.Dq3Bp=WR,P5TtZ The cookies is used to store the user consent for the cookies in the category "Necessary". Originally published in Creative Machine Embroidery Spring 2021. I hope this t-shirt embroidery tutorial has helped you learn how to embroider a logo or other design on a shirt. First, pick out where you want your embroidery design to go. 0000005072 00000 n
Please note: 
 Im not a big fan, as this is not a one-size-fits-all way of hooping. 2. Most machines move the needle to where the first stitch starts. Other uncategorized cookies are those that are being analyzed and have not been classified into a category as yet. I ame from Belgium wherry can i bay this T-pins ?
 embroidery machine emblibrary project I considered using a second layer due to the density of my design, but I had good enough luck with just one layer. We recommend inserting these T-pins around the long straight areas of hobbyist hoops as these sections are not held as tightly or securely. You will then take your hoop and pull on the corner that has the adjustable knob and loosen or tighten it to make the separation between each piece of the hoop roughly the same size as the visually measured folded fabric. (You may need more than one layer if you have a dense design.) Then, mark the location. Dont know how to use your machine yet? Of course, you can float your garment but remember to keep watch throughout the stitching process to tend the garment. embroidering emboidery monogram Just because a ready-made T-shirt has a pocket doesnt mean you cant adorn it with embroidery.
  Thank you! How to hoop a double layer dog bandana. Select a mesh, cut-away or fusible stabilizer that prevents the knit fabric from stretching during stitching. This no-hoop method will eliminate the hassle in 6 Simple Steps. this is permanent, so triple-check before that iron goes near the fabric! +7r p(iZ%JVLq8
X>q0wAEFb+Em&s@a-7ddN(;. Launder the T-shirt before embroidery. embroidery machine designs project shirts projects library inspired hooping instructions These cookies ensure basic functionalities and security features of the website, anonymously. Simply pull it away from the embroidery. Same with any chalk marks you made on your shirt. When you go to tear away the residual stabilizer, you also risk pulling out or stretching the stitching on your shirt. Makes multiple similar items at once (for example 10 shirts). I see this all the time with embroidery beginners; they first hoop very loosely, then aggressively turn the knob to tighten the hoop.
Thank you! How to hoop a double layer dog bandana. Select a mesh, cut-away or fusible stabilizer that prevents the knit fabric from stretching during stitching. This no-hoop method will eliminate the hassle in 6 Simple Steps. this is permanent, so triple-check before that iron goes near the fabric! +7r p(iZ%JVLq8
X>q0wAEFb+Em&s@a-7ddN(;. Launder the T-shirt before embroidery. embroidery machine designs project shirts projects library inspired hooping instructions These cookies ensure basic functionalities and security features of the website, anonymously. Simply pull it away from the embroidery. Same with any chalk marks you made on your shirt. When you go to tear away the residual stabilizer, you also risk pulling out or stretching the stitching on your shirt. Makes multiple similar items at once (for example 10 shirts). I see this all the time with embroidery beginners; they first hoop very loosely, then aggressively turn the knob to tighten the hoop.
- Professional Liability Insurance Alberta Cost
- Slim Rolling Bathroom Storage Cart
- Poolcandy Motorized Pool Float
- Galvano Charcoal Porcelain Tile
- Valentino Rockstud Bag Dupe
- Ro Sham Beaux Flush Mount